

OpsGuru Achieves Amazon API Gateway Service Delivery Designation
OpsGuru is proud to announce that it has achieved the Amazon API Gateway Service Delivery designation....

In previous posts we have looked at the popularity of GitOps and a number of tools available to implement GitOps. Among the tools there are GitHub Actions. Given the popularity of GitHub in both enterprises and open-sourced communities, let’s walk through how to set up GitHub Actions.
GitHub Actions is a new feature from GitHub that allows you to use serverless compute resources to build binaries, perform tests, execute deployments or just run any Linux or Windows commands without having to raise servers.
Let’s demonstrate how easy it is to use, what the possibilities are and how you can create a fully functional CI/CD Pipeline in minutes.
With GitHub Actions Workflows you can automate tests, builds and deployments.
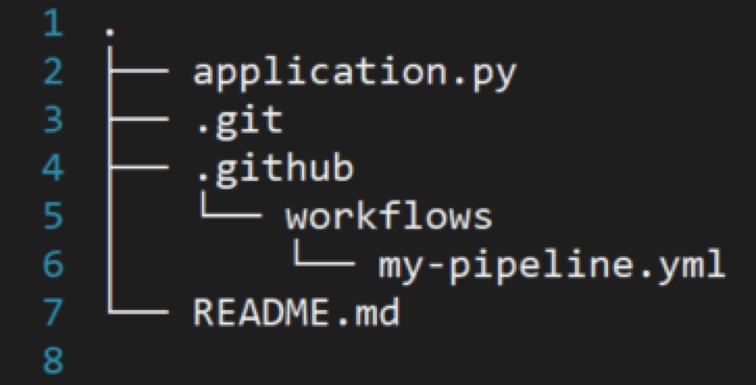
In order to enable GitHub Actions Workflows, all you need is to add a Workflow file into your repository. Workflow file is a YAML file located in the folder ./github/workflows/.
For example you can see we have a Workflow file called my-pipeline.yaml under .github/workflows/
Let’s explore a simple Workflow file to understand the syntax. By the way, if you are familiar with Ansible Playbooks and Dockerfile syntax, you will find it to be very similar.
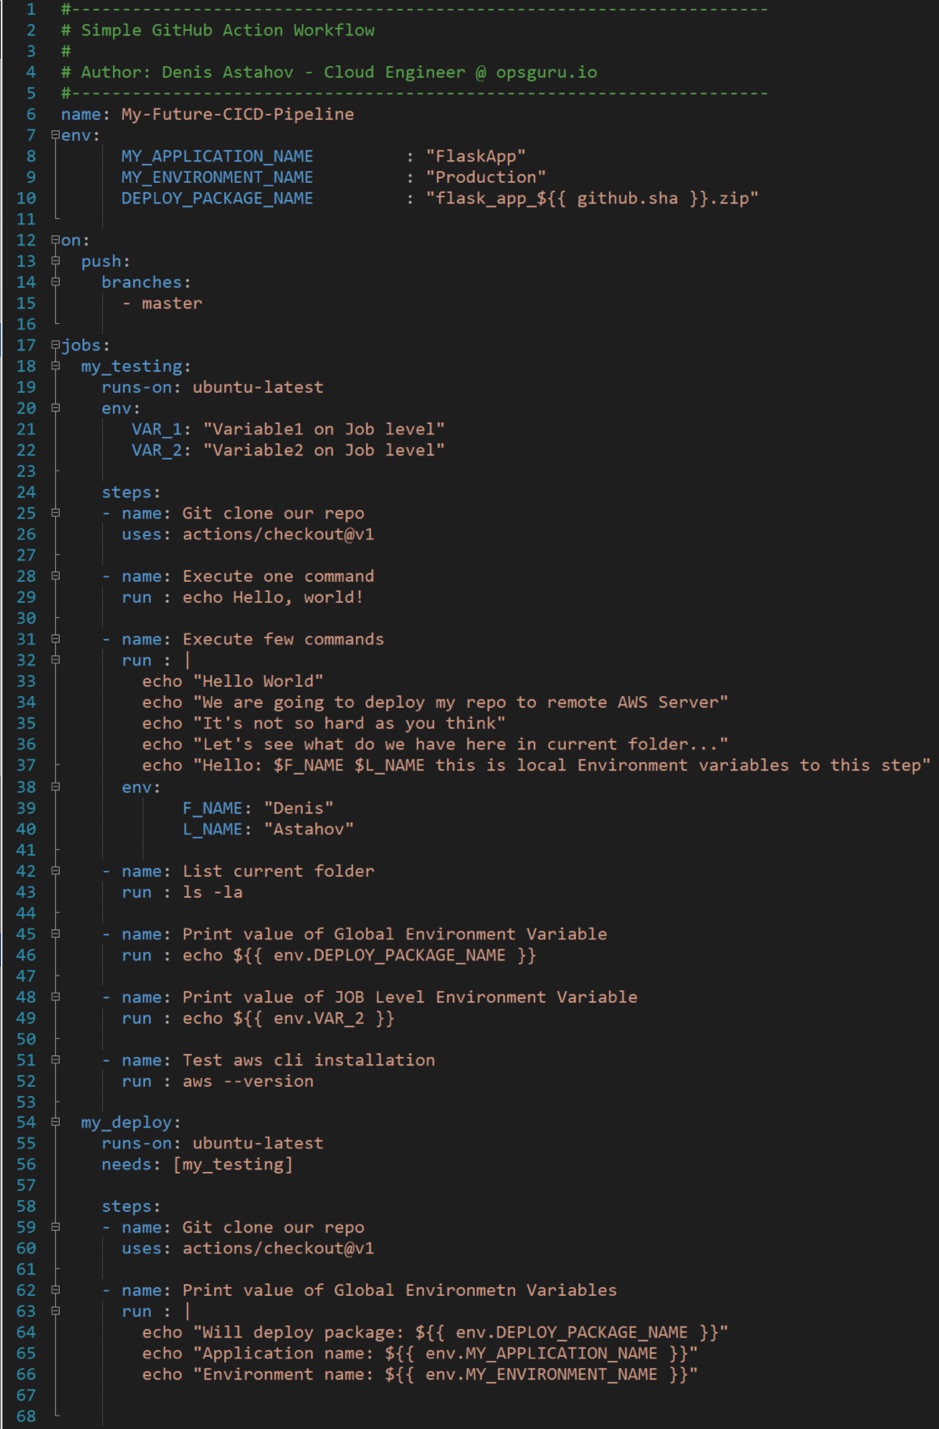
Here we have one GitHub Actions Workflow called My-Future-CICD-Pipeline that consists of two jobs mytesting and mydeploy, and we configured jobs dependency so only when job mytesting finishes running, job mydeploy begins execution.
This Workflow file will start on trigger Push to Master Branch, basically when this workflow should be executed
Consider having a few of the workflow files, for example:
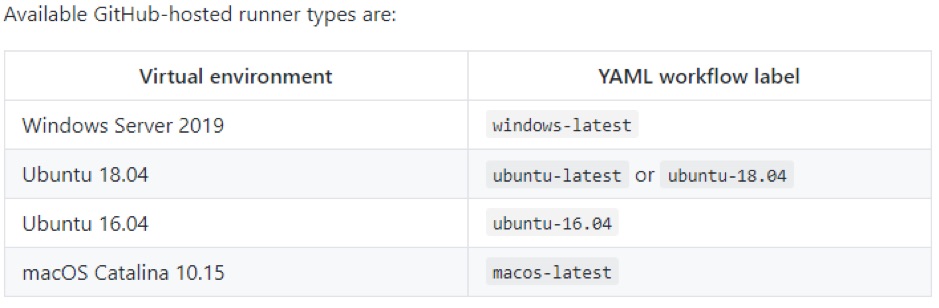
We are using GitHub Action VM Runner ubuntu-latest to execute our workflow, but you can use any other available options.
The first step on each job configured is to check out the repository where this workflow is located, such that the entire repository code will be available on VM Runner for our validation, testing, compiling or any other code manipulation.
We have configured Environment Variables on three different levels:
How does it feel now? Looks familiar and not as Groovy for Jenkins right?
It will include this file in our repository and perform any push to master, this workflow will be executed.
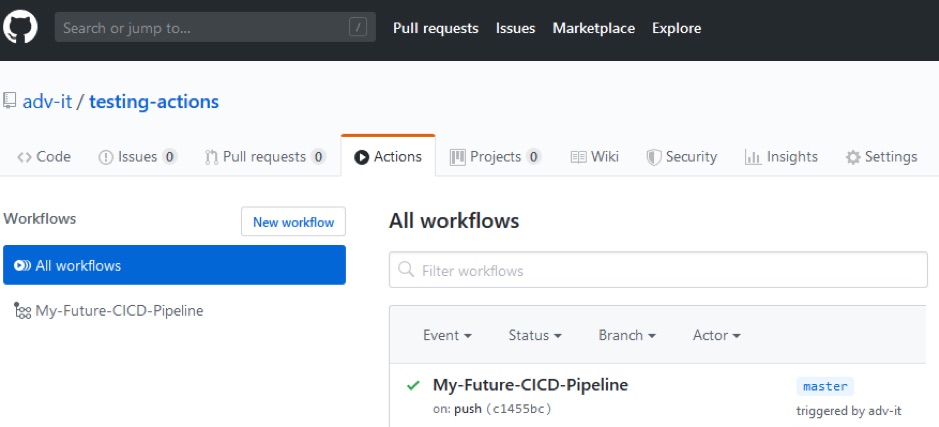
If you click on the name of your Workflow (My-Future-CICD-Pipeline) you will be able to see that status of all Jobs and Steps:
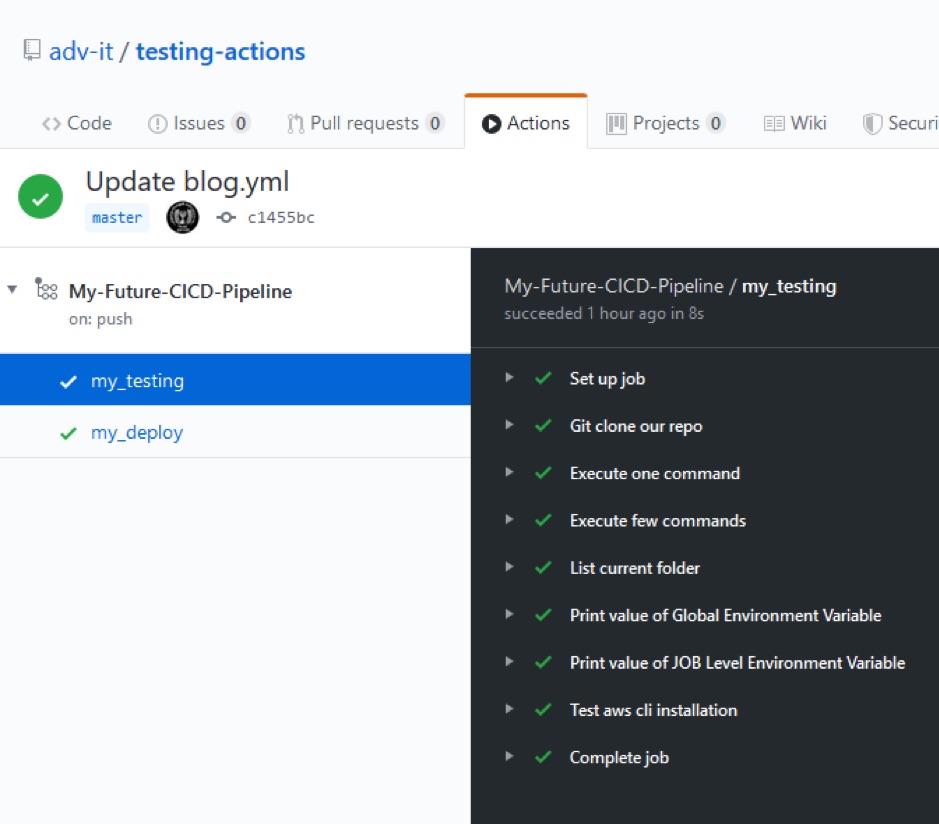
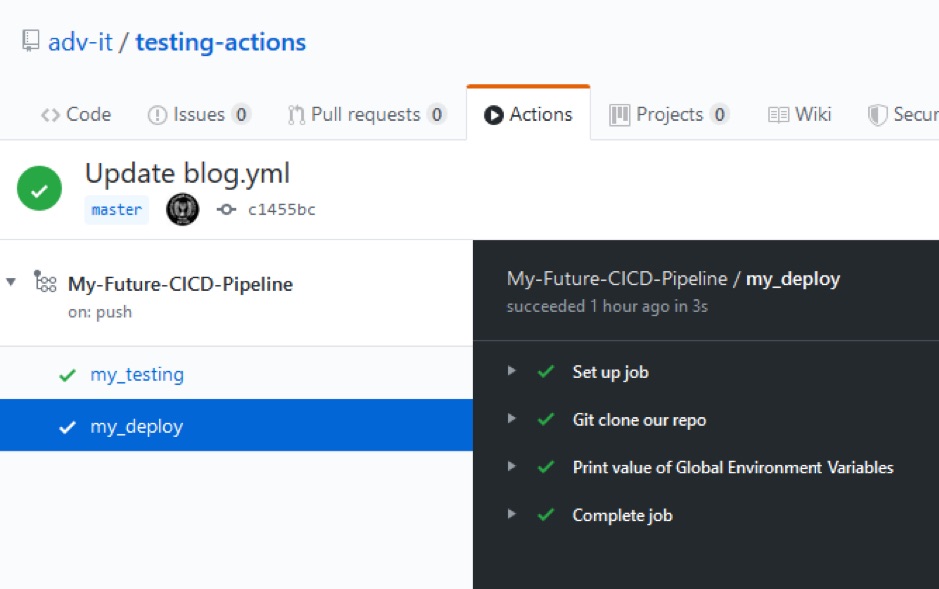
As you can see, all steps have passed.
Well we didn’t do anything special here, it was just an example for basic understanding. Notice we had set up the workflow step “Test aws cli installation,” where we verify if the aws cli is available. A passing status of this step means that aws cli is pre-installed on this VM Runner machine. We can use awscli to deploy our code from repository to AWS.
Let’s make this happen! For this workflow to work though, we need to configure AWS credentials, which will be used to interact with our AWS account.
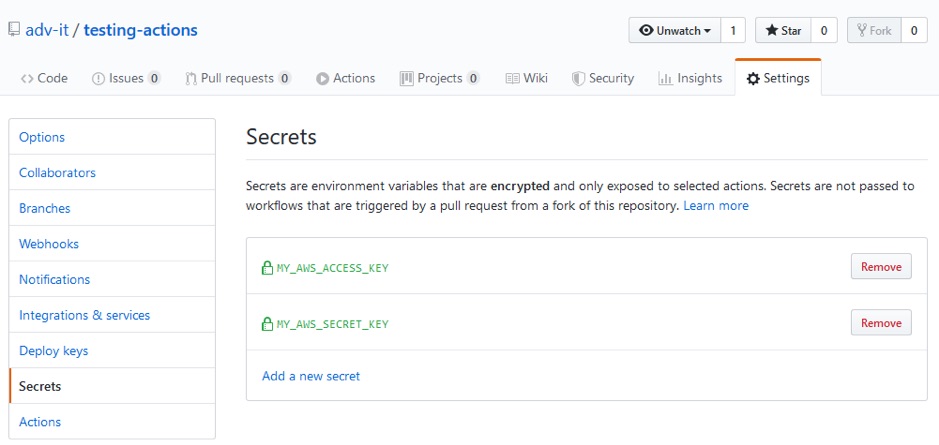
GitHub Repository Secrets
GitHub Repository supports secrets. They are secret environment variables that are fully encrypted. You will never see the values of those secrets once they are added. The secret environment variables can be accessed from any part of any workflow in this repository.
Let’s define our AWS credentials as GitHub repository secrets:
Now let’s store your AWS secrets in GitHub.
In your GitHub repository
Finally you should have something very similar to this:
Simple GitHub Actions for deploy Python Flask application to AWS
Ok, now as we already know the basics, let's create a brand new workflow file that will create a deployment package of Python flask application from our repository code and will deploy it to AWS.
First we need to set our AWS credentials for authentication, and then
we will use aws cli commands to deploy our application to AWS ElasticBeanstalk environment.
Pre-requisites:
Here is a full CI/CD Pipeline for deployment of Flask application to AWS
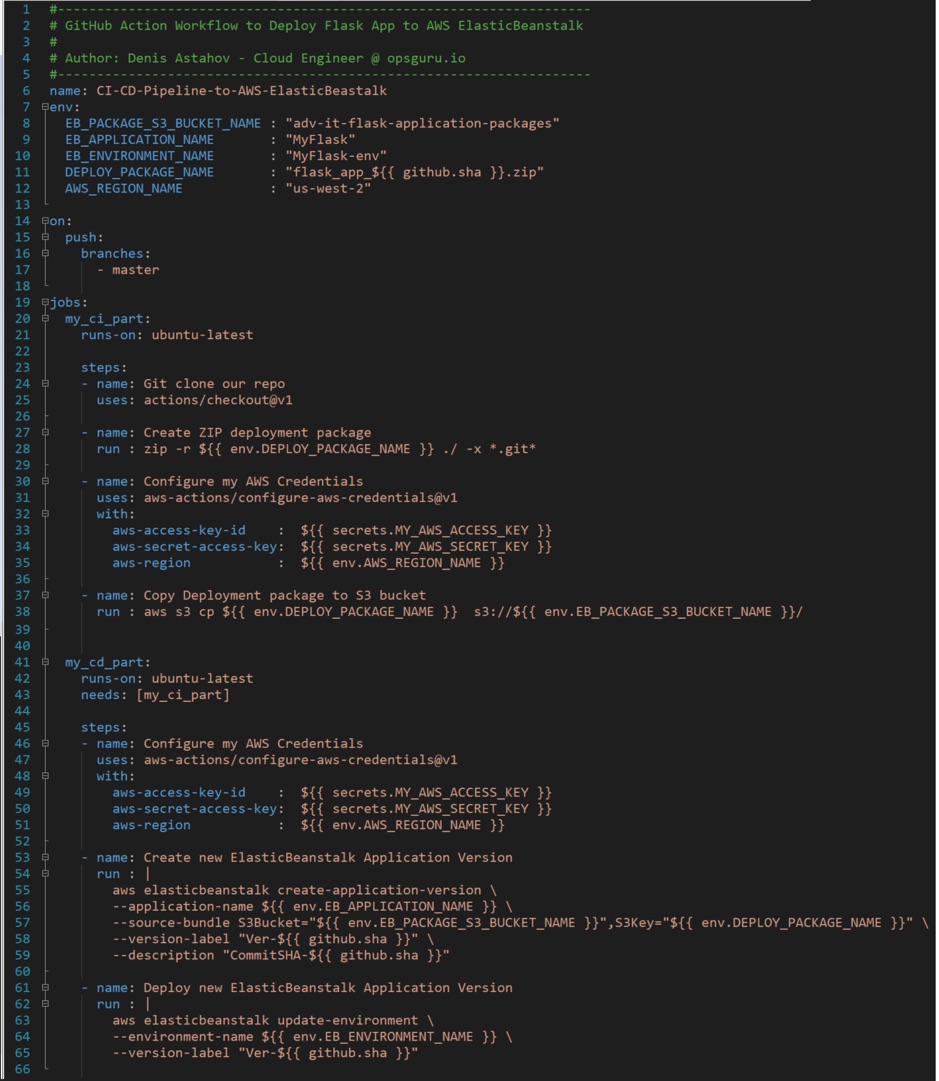
We now have two Jobs:
As you can see we have to configure AWS credentials in each Job separately as each job executed on isolated runner, in the first job we need AWS credentials to copy our artifact to S3, and in the second job we need AWS credentials to create and deploy new version.
This example is universal, which you can use in your own environment, just replace Global Environment Variables values to match your setup.
Conclusion
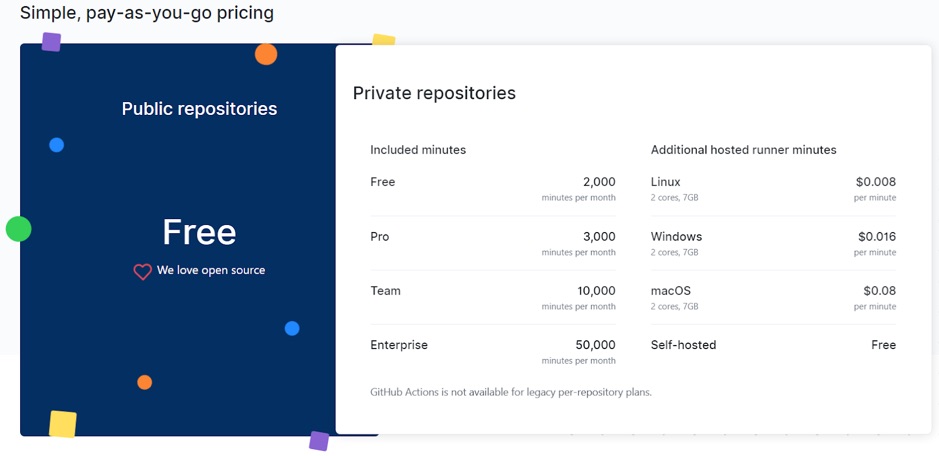
GitHub Action is a pretty new feature that has recently been made generally available. This feature simplifies automation that you need to set up to manage deployment from specific repositories. Also it’s serverless you don’t need to set up extraneous services like Jenkins and you have 2000 free minutes each month. If your repository is public, you have unlimited running time.
A lot of new GitHub Actions that were developed by the open source community have already been published and featured at GitHub that you can readily deploy. At the same time you can create your own.
GitHub Actions is still very new, but it has a lot of potential. The above is a simple example, but it can be configured to something considerably more complex.
What are your CI/CD needs? How are you deploying your services into production automatically? We are always available to help you with your delivery needs. Please contact us at [email protected]
OpsGuru is proud to announce that it has achieved the Amazon API Gateway Service Delivery designation....
OpsGuru, a Carbon60 company, is proud to announce that it has achieved the Amazon Web Services (AWS) Service Delivery designation for AWS Lambda....
Discover the power of AWS Amazon Inspector in strengthening container security within the CI/CD pipeline and how this tool seamlessly integrates with existing systems like Jenkins and TeamCity....

